This article explains how to prepare your artwork for custom labels. You can take artwork you’ve already created and prepare it for printing.
It doesn’t cover how to create a beautiful label design from new. If you need to know how to do that, you can read all about how to do this in our article "How do I design my own custom labels?"
Here are the key steps to cover when preparing your custom label artwork for label printing:
- Convert colours to CMYK
- Convert text to curves
- Create a cutline
- Add a bleed
- Use vector where possible
- Use high-quality images
- Link artwork (if in Adobe)
Let’s go through each one in detail.
1 - Convert colours to CMYK
The first step is to make sure your colours are in CMYK mode.
CMYK stands for; cyan, magenta, yellow, and black. This is a colour model which is used to build various colours. The other option is RGB (red, green, blue), which is used on computer screens or TVs because we use light sources to build RGB colours.
The reason we want to design in CMYK format is because we print in CMYK. In fact, almost every printing process uses CMYK. Therefore, you will get more accurate representation of the colours from your screen to the final printed product.
There are approximately 16,000 CMYK colours available, whereas there are more like 16 million RGB colours. So some of the colours you see when designing an RGB won’t be possible to print, and that’s why it’s important to convert your colours to CMYK. Learn more about CMYK vs RGB here.
2 - Convert text to curves
Converting text to curves really easy, this short animation shows you how to do it on Adobe Illustrator.
<iframe src="https://drive.google.com/file/d/1ujV2mHV53UfrCC9I-tgJ_awPpkkPMFvE/preview" width="640" height="480" allow="autoplay"></iframe>
The reason we want to do this is that it minimizes the risk of the text changing when sending your file.
If you don’t convert your text to curves, it relies on the other user having the correct font installed, and because there are so many fonts in the world, this can be a risk.
So as you can imagine, this is fine for popular fonts such as Aerial or Times New Roman, but not so good for specialist fonts which brands often use in their label artwork.
Add to that the use of specific kerning, line spacing or other font features, this is essential.
3 - Create a cutline
Adding a cut line can be complex if you want a custom shape, so if you don’t know how to do this, don’t worry, we’ll do it for you.
When uploading your artwork, just describe the shape you’d like your cut line and our designers will send you a design proof. Here is where you add instructions:

If you want to create labels that are; square, circle, rounded corner, or another simple shape, simply draw your desired shape around your design, centre it and change the fill colour to blank. Like this:
<iframe src="https://drive.google.com/file/d/1v5nZqm82OX3VrCuxssZEdGBDut0M7kRb/preview" width="640" height="480" allow="autoplay"></iframe>
To create a custom shape, we recommend using the contour tool. Group the objects you want to contour, then apply the contour. Adding a nice 2 mm border can work well.
See this in action here:
<iframe src="https://drive.google.com/file/d/1vH-tNLHVdXrYIYkdzhHCKpgJAP6eOam7/preview" width="640" height="480" allow="autoplay"></iframe>
4 - Add a bleed & a safe zone
A bleed is an area that is a continuation of your design that you plan to have cut off during manufacturing.
Are safe zone is an area close to the cut line that you leave in case cutting is slightly misaligned during manufacturing.
We typically recommend a 2 mm bleed and 2 mm safe zone.
This image helps to explain the bleed in the safe zone.

If your design is too small to allow a big enough safe soon, don’t worry too much. Our cutting a super accurate, so tends not to need it.
5 - Use vector where possible
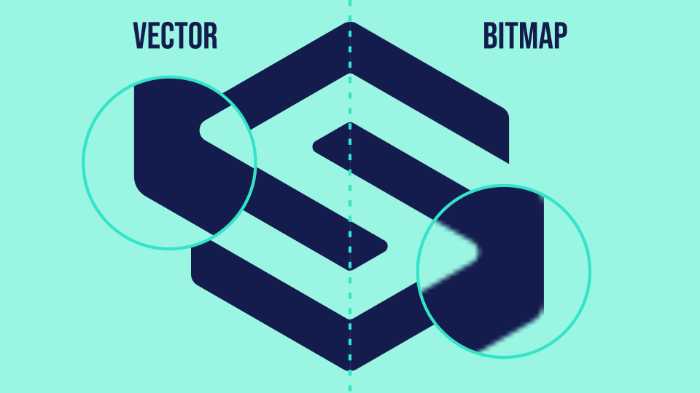
We accept many file types, but vector graphics use mathematical equations to create shapes and colours. Whereas bitmap artwork uses pixels (which are tiny dots).
The benefit of vector artwork is that because it’s made of maths, it can scale to any size that you require. It’s also easy to edit colours shapes, or anything else that you need to change.
This image helps to explain the difference between vector and bitmap:

You use photo editing software such as Adobe Illustrator or CorelDRAW to create vector artwork. You can also get vector artwork from Canva.
6 - Use high-quality images
If you do have images as part of your artwork, then it’s important to make sure that the image is of high enough quality. A low-quality image will produce a suboptimal sticker.
High resolution images can never be a vector - they are always bitmap. It’s absolutely fine, just make sure that they are high enough quality.
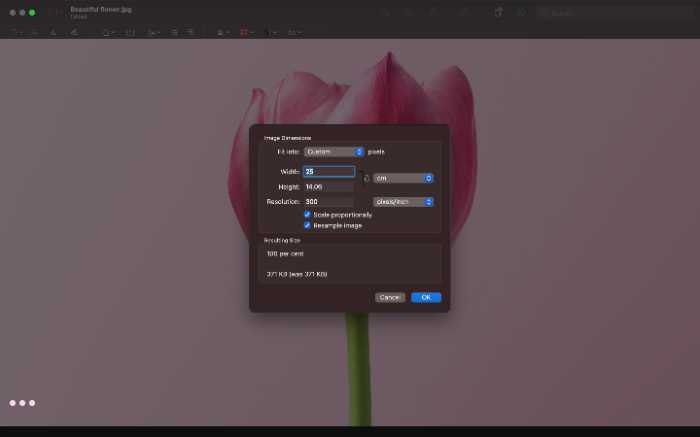
We recommend a 300 DPI image at 1:1 scale of your final printed label. This will ensure that it prints nicely without being blurry.
If you work on a Mac, open your image in Preview, select 'Tools' then 'Adjust size' and it'll show you the size & resolution of your image formats. I'll look like this:

7 - Link artwork (if in Adobe)
When designing in Adobe Illustrator and using lots of big files, instead of embedding them in the file, Adobe just links to them as external files.
What that means is when you share the original Adobe file (such as AI or PSD), you need to make sure you include linked files when exporting.
You can easily do that by selecting this option here:

It will create a bigger file that will mean that all of the images and anything else that you have included in your design file are linked and can be used by our design team.
Submitting artwork can be super easy. Simply follow these steps, and your custom label design will fly through the proofing process. Are you ready to try it out for yourself? Then head to the custom labels page to get started.
If you want to learn more about the world of custom printing, then these articles are for you:
- Can I get my design on a sheet?
- Can I print white on a clear label?
- Do I enter my sheet size or individual sticker size?
- How to order custom labels online
- Is it cheaper to print your own labels or to buy them?
- The advantages of sheet labels
- What do sheet labels look like?
- What is the best size for my custom labels?
- What size are your sheet labels?
- What's the difference between custom labels and sticker sheets?


Comments
0 comments
Please sign in to leave a comment.